Piano Finishes & Finish Repair
- Jun 1, 2021
- 9 min read
Updated: Jun 28, 2022
By Piano Buyer Staff
Anyone whose piano has been damaged in an accident or when being moved knows the inconvenience of having to deal with getting its damaged finish repaired. For this article, we interviewed two experts in piano finish repair — Sally Phillips and Gregory Cheng — about what’s involved in addressing different types of damage.
Refinishing vs. Repair
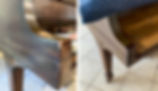
Before and after photos of veneer replacement on the arm of a grand piano by Sally Phillips.
The first thing they explained is the difference between refinishing and repair, the latter also known as touch-up.
In refinishing, all or a substantial portion of the piano’s original finish is removed, either by sanding it down or by chemically stripping it off. If the finish is completely removed, the pores of the underlying wood veneer are then filled, the veneer is stained (if a wood color), and the new finish is sprayed on. Many coats of finish are applied, each coat lightly sanded before the next is applied, and the final coat is hand rubbed or polished to a specified sheen, from satin to high polish.
With repair, the original finish is left in place, but the damaged area is built up with filler, new veneer, and/or multiple coats of finish, then sanded and polished to match the adjacent undamaged finish.
With refinishing, any damage completely disappears. With repair, a good touch-up artist should be able to make the damage unnoticeable by anyone previously unaware of the damage who looks at the piano at a normal distance in normal lighting. However, the repair will often be discernible to someone aware of the damage and its location, and who looks closely enough in good light.
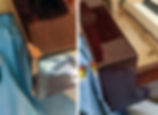
Before and after photos of a damaged arm of a grand piano by Gregory Cheng.
The restorer must decide, based on cost and expected results, whether it’s better to strip and refinish the entire part or attempt to repair it. In some instances, the most cost-effective repair is simply to replace the part.
The time it takes to perform finish repairs varies with the type and location of damage. Most repairs can be done in the home in two to four hours. In some instances, however, it’s better to take the damaged part back to the shop to repair it under more controlled conditions. Parts such as fallboards (key covers), music desks, and pedal lyres are easily removed; a lid can be transported if the technician has a big enough vehicle or can get the help of a piano mover. Legs can be temporarily removed while the technician is in the home, but it’s not safe to leave a grand piano on a jack or stand for a long period. It’s better not to move the entire piano to the shop for finish repair — any time a piano is moved risks additional damage to it — but sometimes it’s unavoidable.
Piano cabinet construction varies significantly with the type of piano, its intended use, and its price. All cabinet parts — panels, rim, fallboard, music rack, lid, etc. — are covered by a thin veneer of wood, about 1/16″ thick, on which is applied either a solid-color finish — usually ebony (black), but occasionally white or another color — or a clear wood finish, the latter used with fancy veneers such as walnut, figured mahogany, or rosewood. The core material of these parts, under the veneer, can be of a number of materials, depending on the cost and quality of the piano. Typically, odd numbers of wood layers are glued together, the grain of alternating layers running perpendicular to each other to minimize warping. In the non–tone-producing parts, however, especially in pianos designed for home use, these layers can include medium-density fiberboard (MDF), or even foamboard or cardboard. The harder the core material under the finish, the easier it is to get a consistent finish over the surface of the cabinet part. The softer the material, the more easily it’s crushed and the harder it is to repair.
Types of Finish
Lacquer
Lacquer refers to a number of clear or colored coatings that dry by solvent evaporation. Nitrocellulose lacquer finishes for pianos began to become popular in the 1920s. Although now largely replaced by polyester finishes (see below), lacquer finishes are still used on some high-end pianos, on some higher-end models of consumer-grade pianos, or by special order. They’re relatively easy to apply and can be polished to any sheen, from matte to high gloss. The elegant but understated appearance of a hand-rubbed satin lacquer finish blends well with antiques and older homes, and high-gloss lacquer finishes have an apparent visual depth unmatched by modern finishes.
The softness of lacquer, however, means that it can be easily scratched — even a moving blanket can leave scratches or imprints — but it’s also perhaps the most forgiving of finishes. It’s common for a finish technician to follow a freshly delivered lacquer-finished piano to remove moving-pad and other minor marks and bring the piano back to its showroom finish.
Hand-rubbed satin lacquer finishes should never be polished in a circular motion, as that destroys the parallel micro-scratches in the finish — and it’s the reflection of light by those tiny scratches that creates the satin-like appearance. Always polish in the direction of the grain of the wood veneer or, if an ebony finish, in the direction of the micro-scratches. If you’re dusting your piano, start with a Swiffer duster and dust in the direction of the grain before applying any cleaner, as the dust alone can scratch a lacquer finish if rubbed across the grain. Never use household cleaners on a lacquer finish. Cory Products (www.corycare.com), also available from Allied Piano (www.alliedpiano.com), makes a variety of cleaners especially for pianos, including a satin-sheen cleaner that gives great results. Don’t spray a cleaner directly on the piano. Instead, spray it onto a clean, soft, microfiber rag, then wipe.
Polyester
Polyester finishes have been popular in the piano industry worldwide since the 1950s. Most modern pianos have a polyester finish, either high-gloss or satin — even wood-veneered pianos have a topcoat of clear high-gloss or satin polyester. Polyester makes a highly durable finish that resists most scratches. It can be sanded and polished to remove minor scratches, and can be buffed with a powered buffing wheel, as in the factory, to create a high-gloss shine. Polyester seals wood better than lacquer, and resists water and most solvents; its durability makes polyester the best choice for a high-gloss finish on most pianos.
A disadvantage of polyester is its brittleness — it can crack from impact or being dropped. When that happens, the damaged area develops a pattern that looks like broken glass, and any broken or loose polyester must be completely removed before repairs can be made. Polyester can also crack when exposed to extreme temperature changes, but advances in polyester finishing techniques and greater care by piano movers have nearly eliminated this as a problem.
Even when it’s technically possible, it’s generally not economically practical to strip off large areas of polyester finish, but it can be buffed and polished many times over the life of the piano. For surface repairs, polyester more easily hides damage than other finish material because it’s applied more thickly. Ebony polyester finish comes in many subtle variations of “black.” Good furniture-repair technicians are skilled at color matching, and have access to dyes, pigments, and manufacturers’ color formulas; usually they can match any variation of “black,” and any wood colors.
Polyurethane
An “off-the-gun” polyurethane finish is a satin finish applied with a spray gun, often already mixed with color or stain, and not hand rubbed after it cures. The finish contains an epoxy-like curing agent that dries to a very hard surface. Though this type of finish has gotten much better looking in recent years, it doesn’t have the elegant look or sheen of a hand-rubbed finish, and so is used on modestly priced instruments and for less costly refinishing jobs. The disadvantage of a polyurethane finish is that it’s very difficult to repair — when sanded, it tends to separate easily from the wood, making even simple repairs challenging, and difficult to entirely conceal. It’s often more cost-effective to replace the damaged part.
Historical Finishes
Over the years, the piano industry has experimented with or used a number of different types of finish, the best known being shellac and varnish. Shellac, used before about 1860, was applied in many layers, using a special rubbing pad lubricated with one of a variety of oils in a technique known as French polishing. This produced a beautiful but very soft and delicate finish that easily showed damage from water or alcohol. Varnish, used from the 1860s to the 1920s, was thicker than shellac, and filled the grain faster — but it tended to darken with age and exposure to sunlight, producing a crazed or “alligatored” look.
By now, most original shellac and varnish finishes have completely aged, or have become crazed across most or all of the piano’s surfaces, and major repairs to these finishes aren’t possible with the techniques and materials commonly used by today’s repair technicians. Attempts to rejuvenate crazed finishes with solvents that smooth out the crazing tend to be unsuccessful because too much dirt has accumulated and become embedded in the old finish. Refinishing the entire piano would be the best option, but considerations of cost vs. the value of the piano usually argue against that. Typically, if a piano’s shellac or varnish finish needs refinishing, the instrument probably also needs to be completely rebuilt or replaced.
Types of Damage
Shallow Scratches
Scratches that go only part way through a hand-rubbed satin lacquer finish, and not into the wood itself, are typically the easiest to repair — either by sanding or rubbing out the area, or by building up lacquer in the scratch, sanding it smooth, then rubbing it out. To avoid hand rubbing, some technicians use a spray-on lacquer that dries to a satin sheen. Shallow scratches in polyester can usually be buffed out and eliminated with special polishing compounds. Slightly deeper scratches may need to be opened slightly to accept polyester, then sanded and buffed to match the sheen of the surrounding undamaged area.
Deep Gouges, Dents, or Chips
Gouges that remove a lacquer finish down to the unstained veneer are easy to repair with fillers, and lacquer or hard-wax burn-in sticks. Burn-in sticks — short lengths of solid lacquer or wax that melt when heated — are used to fill dents or scratches. They’re available in many colors, and can be mixed to achieve other shades. A faux wood grain can be painted on to match the surrounding area; the area then is sealed with lacquer and rubbed out or hand buffed.
In repairing polyester finish that has been gouged all the way down to the unstained veneer, the exposed wood is colored, faux-grained if necessary to match the surrounding area, and sealed; a polyester topcoat is then applied, sanded, and buffed. Some repair technicians fill gouges in polyester with lacquer burn-in sticks, followed by a sprayed-on high-gloss polyurethane finish, but the experts we consulted said that filling gouges in polyester with polyester finish makes for the best repairs.
With both lacquer and polyester finishes, if the area is dented rather than gouged, it may be necessary to first create a larger gouged area down to the wood, then fill it in. Chips or gouges that also take off layers of veneer first require building up with wood or epoxy that can accept the finish.
Damage to Corners and Edges
When veneer on the corner of the cabinet is damaged, often the best repair is to inlay a small piece of new veneer, or build up the area with wood epoxy, to restore the strength of the corner before repairing the finish. Use of new veneer or wood epoxy is especially important on a grand piano when the damaged corner is on the bottom of the bass end. This is the corner that the piano’s entire weight rests on when it’s placed on its side during a move, and softer putties, fillers, and burn-in sticks simply aren’t hard enough to bear that sort of pressure.
Damage in the Middle of a Lid
Damage to the middle of a grand lid or rim is difficult to hide, and repairing it so that it’s completely invisible may be beyond the skill of the average repair technician. In such cases, a decision may be made to completely refinish the lid of a piano finished in lacquer, or to replace a lid finished in polyester. These decisions must also consider the refinisher’s ability to match the stain color and wood grain of the rest of the piano. However, we’ve seen examples of perfect repairs to lids and rims by expert repair technicians — it can be done.
Sun Damage
Sun damage results when a wood-grain finish is exposed to direct sunlight for long periods. Typically, when the front lid of a grand piano is folded back over the rear portion, the sun bleaches or fades the exposed areas, which then don’t match the unexposed areas. Sun damage is usually a bleaching of the wood stain under the finish, rather than damage to the finish itself. It can be repaired only by re-staining the wood, which requires first stripping off the old finish, then, after staining, refinishing with the appropriate topcoat.
Avoiding Finish Problems
Most damage to a piano’s finish can be avoided by not using the piano as a shelf. Placing objects on the piano, such as picture frames, knickknacks, and vases — even when these rest on pads — risks scratches and water damage to the finish.
The next-most-common source of damage occurs when moving a piano. This is not a do-it-yourself project. Hire a company that specializes in piano moving — your local piano dealer can recommend one.
Don’t place a piano in direct sunlight. Over time, this will fade the finish, and can also create problems with tuning stability.
Over the past 35 years, Sally Phillips has worked in virtually every aspect of the piano industry: service, retail, wholesale, and manufacturing. She lives in Georgia, works throughout the southeastern U.S., and can be reached at sphillipspiano@hotmail.com.
Gregory Cheng, RPT, is General Manager and Chief Technician of Allied Piano and Finish, a supplier of finish supplies and training to the piano-service industry. Greg has over 20 years of experience in nearly every aspect of piano technology. He is based in Pennsylvania and can be contacted at www.alliedpiano.com.